
3D Print Quality Troubleshooting
This guide is intended to help you troubleshoot common 3D print quality issues and is applicable to most FFF 3D printers. Updated regularly with new information.
Also check out our Design Rules for 3D Printing
Table of Contents
Click on the images to view full descriptions and solutions


Request a new issue to be covered or submit feedback here.
Curling
Curling refers to the issue that typically occurs on overhangs where extrusions curl upward resulting in a rough/distorted surface. This is more likely to happen with plastics that cannot be printed with the part cooling fan. The plastic is extruded at high-temperature and if not cooled quickly, can result in curling artifacts especially on overhangs. The more severe the overhang the more likely you will be to see curling.
Solutions
You may be able to reduce curling by reducing the print temperature, and/or increase part cooling. However, the plastics that are most likely to exhibit curling (ABS, ASA, etc) may start to have layer adhesion problems if you decrease printing temperature or increase part cooling, especially for large parts.
Design your parts to have less severe overhang geometry.
Orient your part on the build plate in your slicer so that there are as few severe overhangs as possible.
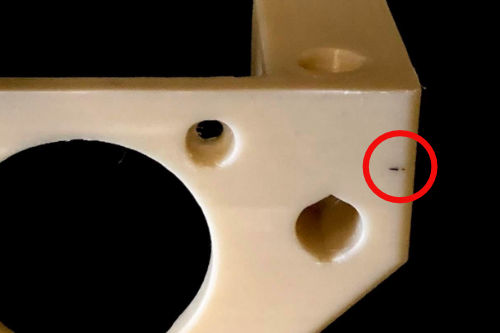
Discoloration (black/brown flecks)

This is typically noticed on lighter colored plastics, specifically white and clear. You might notice little black or brown spots/flecks on your part. There are three potential causes of this issue. One, melted plastic has built up on the exterior of the nozzle and is falling off onto the print. Two, there is residual material from a different plastic you were printing before. Three, your print temperature may be too hot, causing the plastic to burn/discolor.
Solutions
Check to see if there is any plastic build up on the exterior of your nozzle. If there is, heat up the hotend and clean if off with a wire brush.
If you have just switched from a dark color to a light color, it is a good idea to manually extrude plastic after loading material until you are sure the new color is coming through clean.
Reduce your printing temperature by 5-10 °C.
Drooping Overhangs

Overhangs are sections of the part that are slanted with no supporting structure below. It is advisable to avoid overhangs greater than 45° measured from the Z-axis down, however, you will find some materials will be able to handle steep angles like PLA and co-polyesters, while others like ABS, ASA, and Nylon may have issues at 45°, especially with thicker layer heights.
Solutions
Use support structures. The interface between the part and support will have a rougher surface finish but make overhangs much more reliable.
Increase part cooling via the part cooling fan, this may cause warping and layer splitting with large parts or parts that have a high shrinkage ratio when they cool like ABS, ASA, and Nylon.
Print a lower layer height.
Reduce the printing temperature by 5-10 °C, this may increase the chance of layer splitting.
Reduce your extrusion multiplier often referred to as flow in your slicer. This is the least like to have an effect, but in some cases it may help.
First Layer Too Close
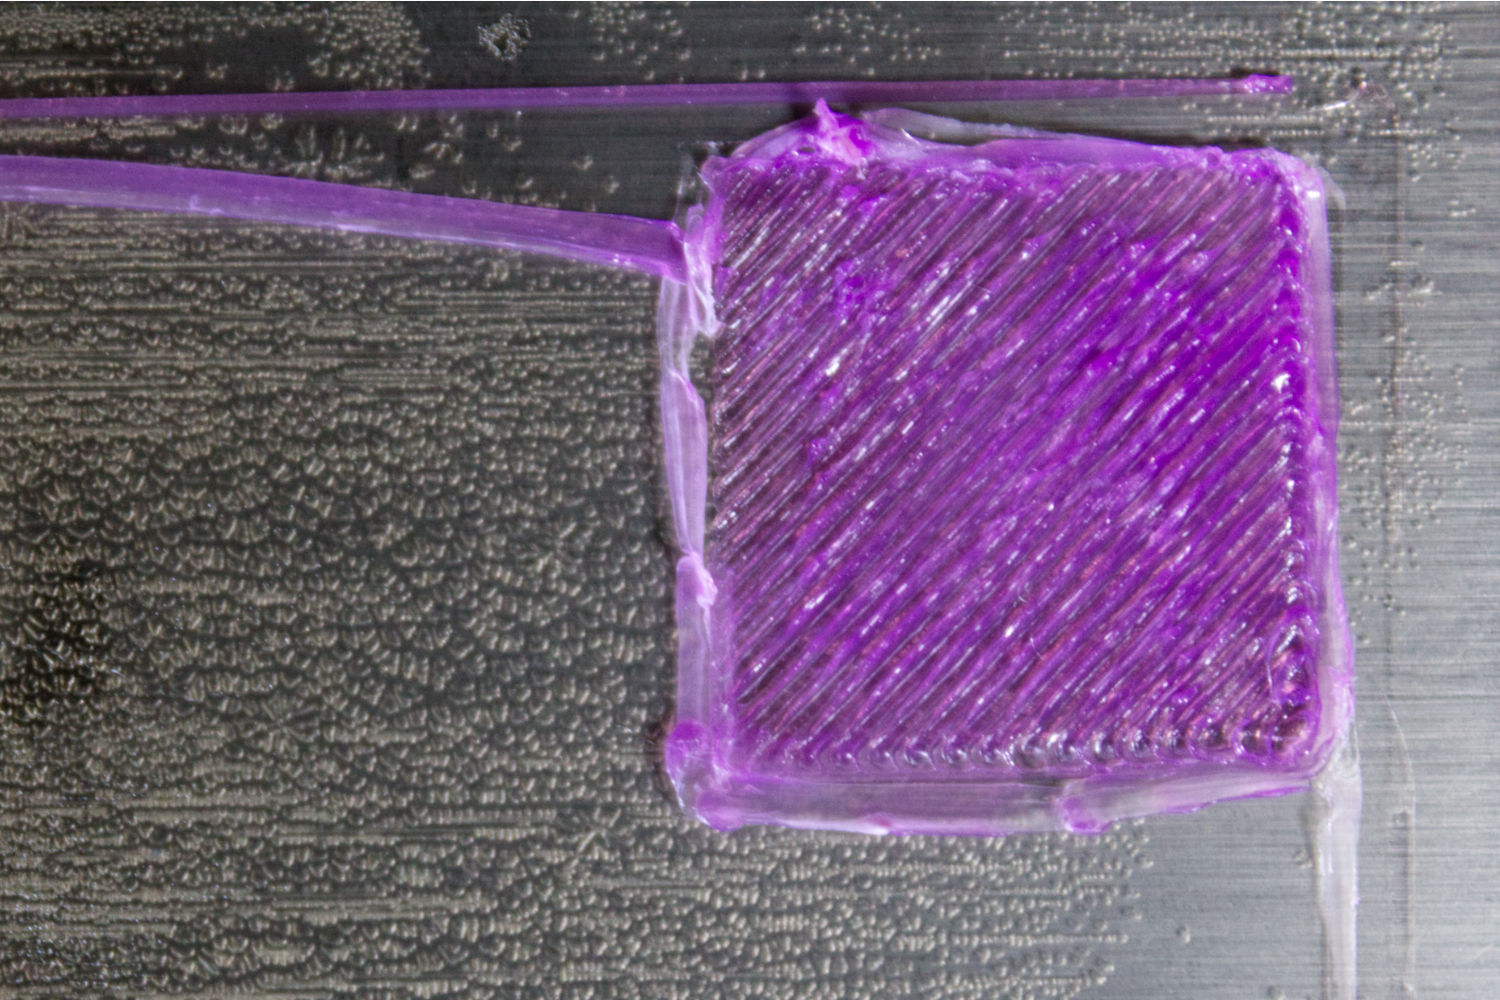
Printing the first layer with your nozzle too close to the bed can cause a variety of printing issues. It can prevent extrusion during the first layer or cause elephant’s foot, making your first couple of layers wider than the rest of the print. This issue can be material specific. It can also be caused by an improper Z-Offset or printing after a failed bed leveling.
Solutions
Increase your first layer Z-offset. Since most modern printers do this automatically, it may be difficult to find the manual override in the settings on your printer.
If your printer has automatic first layer calibration, try cleaning your print’s nozzle. Many printers use the nozzle to probe the bed and debris on the nozzle may result in inaccurate readings.
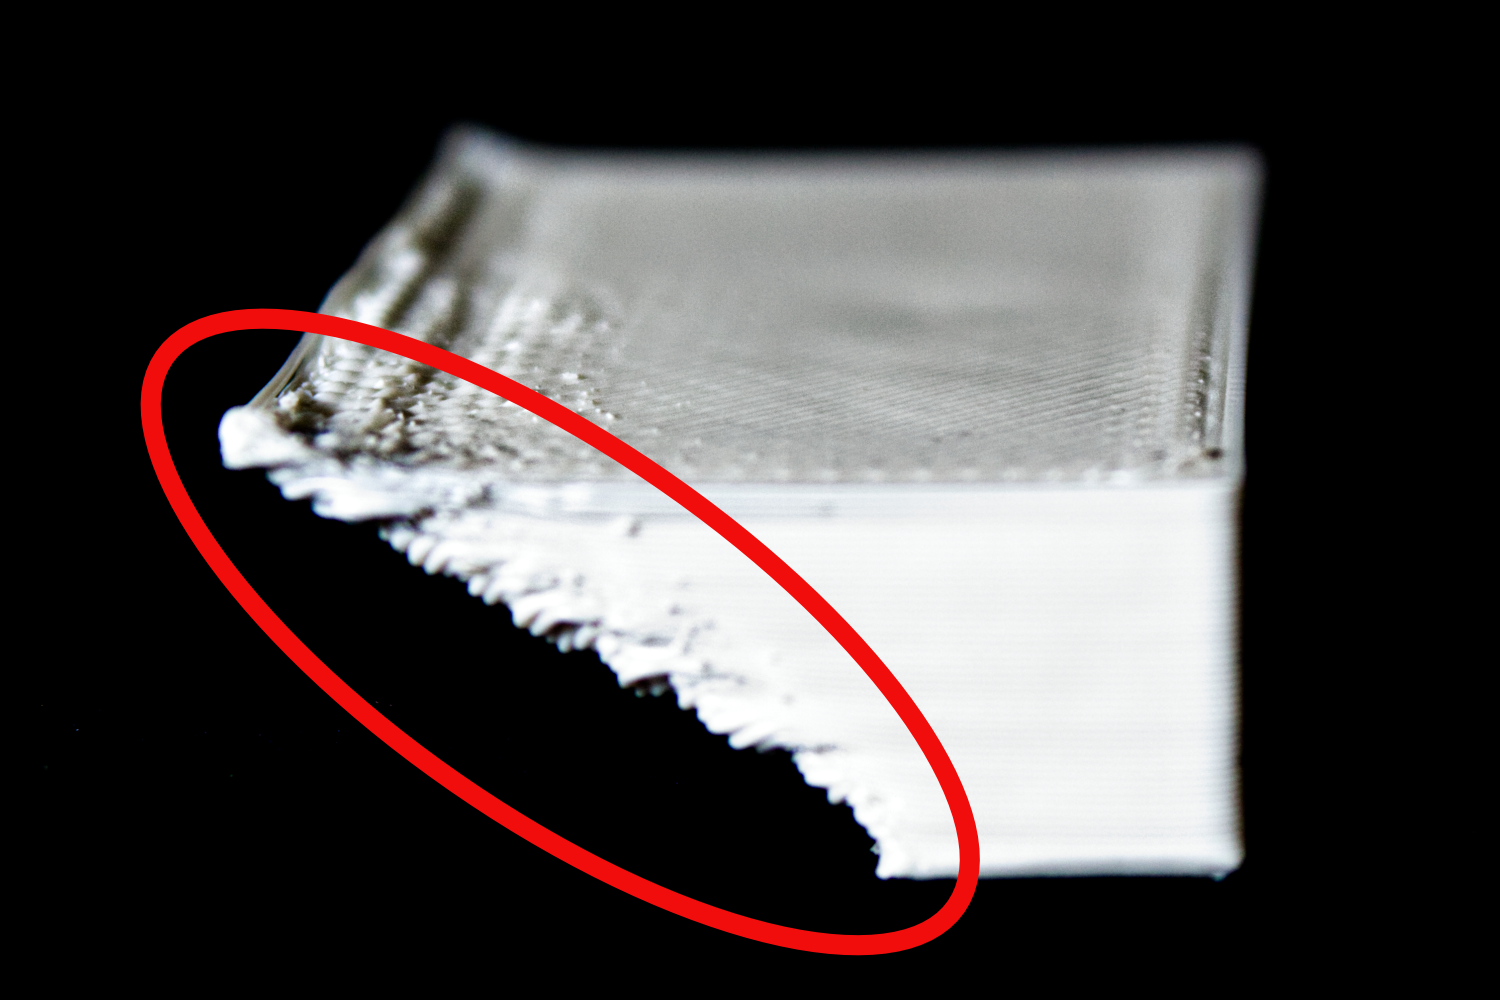
First Layer Too Far

Printing the first layer with your nozzle too far from the bed can cause the part to detach from the bed or lead to gaps in the first layer extrusions. This issue can be material specific. It can also be caused by an improper Z-Offset or printing after a failed bed leveling.
Solutions
Decrease your first layer Z-offset. Since most modern printers do this automatically, it may be difficult to find the manual override in the settings on your printer.
If your printer has automatic first layer calibration, try cleaning your print’s nozzle. Many printers use the nozzle to probe the bed and debris on the nozzle may result in inaccurate readings.
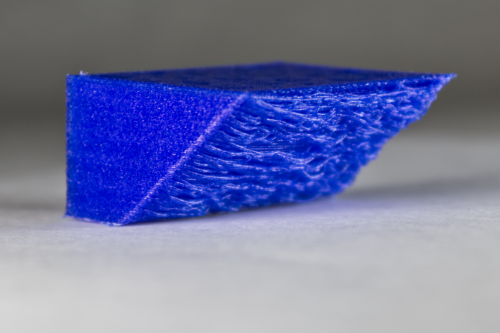
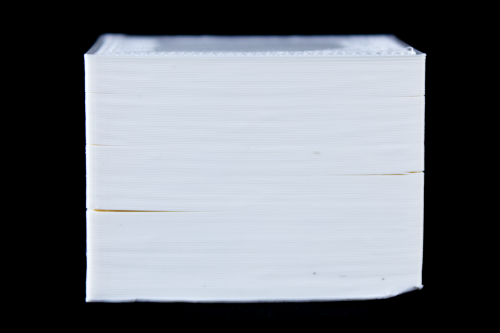
Layer Splitting/Layer Adhesion

Layer splitting occurs when the layers of a part do not bond strongly and as the part cools the shrinkage forces are enough to break the layer bond. This is much more common with materials that have greater shrinkage factors as they cool, like ASA, ABS, Nylon, etc. It also tends to show up more on larger parts. To mitigate this, the goal is to increase the layer bonding of the printed layer with the layer below it.
Solutions
Bolded solutions are the most important in our testing. Many of the factors that enhance layer bonding have the unfortunate consequence of reducing print quality.
Use an enclosed printer.
Increase the flow multiplier. Start with 5% (105% Flow). More material extruded will increase the bond between layers.
Decrease or disable the part cooling fan. This will allow the layers more time to bond while hot.
Increase the printing temperature by 5-10 °C. This will improve the layer bonding.
If the printer is in an enclosure, increase the build plate temperature by 5-10 °C. This will increase the ambient temperature inside the printer, which may slow the cooling process of the printed part, resulting in better layer bonding.
Use a larger diameter nozzle. This typically improves layer bonding.
Print slower. printing slower will allow more time for the material to become fully melted in the nozzle. This is best done by reducing the volumetric flow rate.
If you have manually changed your layer height, make sure that you never use a layer height more than 75% of your nozzle diameter. Typically a layer height of 50% the nozzle diameter or less offers the best copromize between layer bonding and print speed.
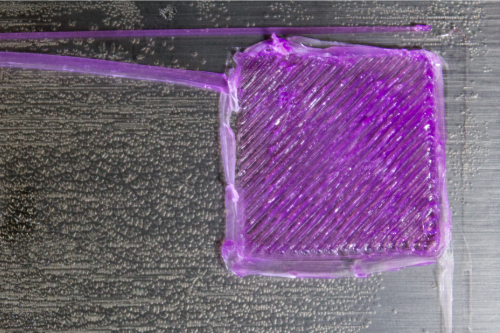
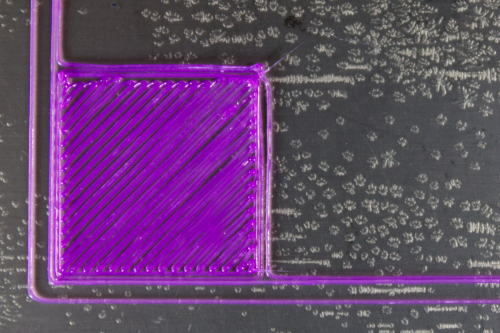
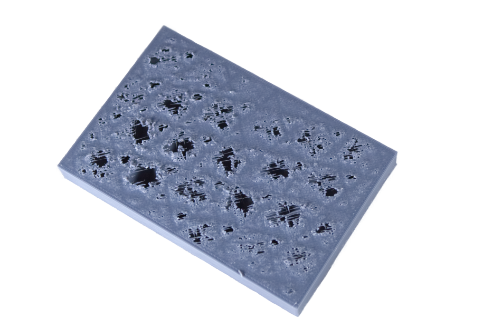
Pillowing

Typically pillowing refers specifically to the situation where the plastic “bubbles” slightly on the top surface, but we will also cover the closely related issue where the top layer does not fill in properly. These issues are usually caused by printing too few top solid layers over a low density infill. Printing temperature and part cooling can play a small role.
Solutions
Increase the number/thickness of the top solid layers in your slicer.
Increase your infill percentage. Typically pillowing issues can begin to show up at infill percentages of 10% and lower.
You may also see improved results by increasing part cooling or reducing the build plate temperature, but this can introduce warping and layer splitting issues for large parts and materials like ABS, ASA, and Nylon.
Stringing

Stringing occurs when material continues to come out of the nozzle while the print head moves to a new location on the print. It is easy to diagnose, you will see thin strings or blobs of material coming off the sides of your parts or between modeled gaps in the part. Certain materials tend to cause more stringing than others, including Co-Polyesters, and Flexibles. Stringing can be caused by wet filament, not enough retraction, printing too hot, or frequent movements over gaps in the part.
Solutions
String is often the result of wet filament. See the section on wet filament below for information on how to dry your filament.
Increase retraction distance, most materials will not require more than 1-2 mm of retraction for a direct drive extrude, you will likely need a larger retraction distance for bowden extruders.
Decrease printing temperature by 5-10°C
You can try enabling “avoid crossing perimeters” Prusa Slicer, this setting may have a different name in other silcers. This setting keeps the nozzle over infill during travel moves which may increase print time slightly but will hide strings inside the part.
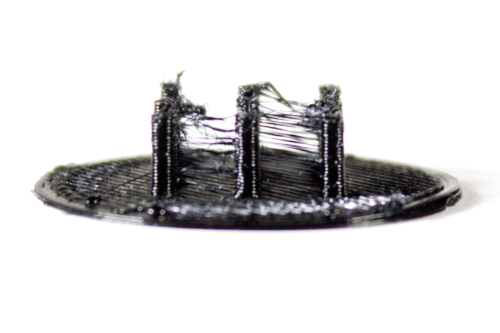
Supports Knocked Over

This issue refers to the situation where a support structure breaks loose during printing, likely causing issues with that portion of the part that was supposed to be supported. There are a few reasons your support structure could be knocked over. If you have a support structure that is tall and thin, it may not have enough surface area in contact with the build plate to reliably keep it attached. You might also find supports breaking free if they are built on a steep angled part of the printed object, or if your printer’s tool head does not lift during travel moves (referred to as Z-hop).
Solutions
If you have tall, thin supports, try adding a brim or increase the first layer expansion in the supports settings in your slicer. You can also decrease the support overhang angle, which will cause more support structures to be generated, resulting in structures that are less likely to break free. You can also try using a bed adhesive like Magigoo in conjunction with a brim to help parts of your print that have a small contact area with the build surface stick.
If supports are being generated on the part that build off of the part and not the build plate, this is a bit trickier. Typically support structures are designed to have a small gap between the support and the model. Since this gap is usually calculated vertically, steep angles surfaces can result in a larger gap. You can set the support z distance to 0, but this may make the support structure more difficult to remove. Support Z distance is usually set to the layer height you are printing at.
Make sure z-hop is enabled in your slicer. This causes the print head to lift by a small amount during a travel move making it less likely to catch on the print and knock something over. Typical z-hop values are between 0.2mm and 1mm. A larger z-hop value will increase print time.
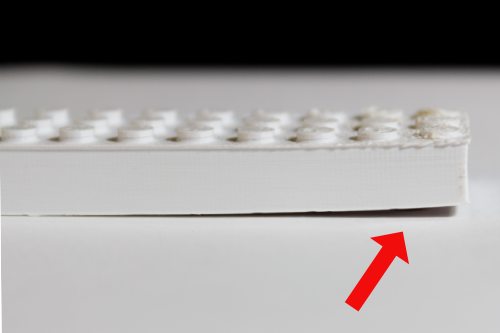
Warping

Warping refers to the situation where the corners of your part begin to lift away from the print surface even though the first layers of your part successfully adhered to the print surface. This is particularly common with large parts and/or materials that have a high shrinkage rate as they cool like ABS, ASA, Nylon, etc.
Solutions
Use of a bed adhesive like Magigoo may also reduce the chance of warping.
Be sure to use the right print surface and bed adhesive for the material you are trying to print. This information is typically supplied by the printer or filament manufacturer.
Add a brim. A brim is a number of extra perimeters that are added around your part for the first layer. This will help hold your part down to the print surface.
Use an enclosed printer.
Decrease or disable the part cooling fan in your slicer.
Increase the build plate temperature by 5-10 °C. This will increase the ambient temperature inside the printer, which may slow the cooling process of the printed part and reduce the chance of warping.
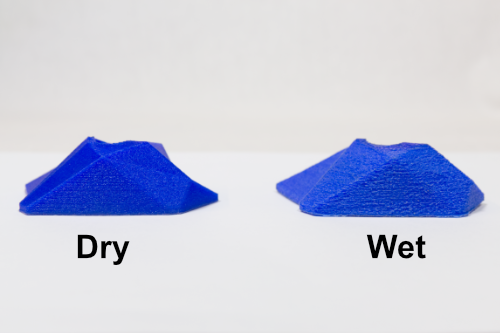
Wet Filament (Poor Surfaces, Popping Noise, Jamming)

If you hear popping noises and or see steam coming from your nozzle, or you see bubbles/rough surfaces on your printed parts, your filament is likely wet. These issues are caused by the moisture in your filament expanding and turning to gas when heated up in the hotend. This can cause poor layer adhesion, weak parts, rough surface finish, stringing, and in some cases cause extrusion to stop completely.
Solutions
Dry your filament using a filament dryer or dehydrator. Make sure to look up the materials recommended drying temperature from the manufacture. Drying at too high of a temperature may result in the filament strands fusing together, while too low of a temperature may not sufficiently remove the water depending on the material.
Once dry, store and print from a dry box. When the hygrometer on your dry box reads a humidity greater than 30% take the material out and dry it again. Some filament dryers double as a dry box that you can print from, such at the Polymaker PolyDryer™
Feedback, Ideas, or Suggestions?
If there is an issue you have been having that you would like to see us cover or if you have any other feedback, please fill out the form below!